When teaching online in a blended course, you may want to have a class Zoom meeting session. This tutorial will detail the simple procedure to correctly setup sessions that communicates the date and time to students as well as provides a link to the Zoom session.
Step 1: Add Zoom to your Canvas Site
If you have a Zoom link available in your Canvas course left navigation menu, skip this section and go to Step 2.
If you don't have a Zoom link in your Canvas course left navigation menu, then navigate to your Canvas course site and click on Settings at the bottom of the page.
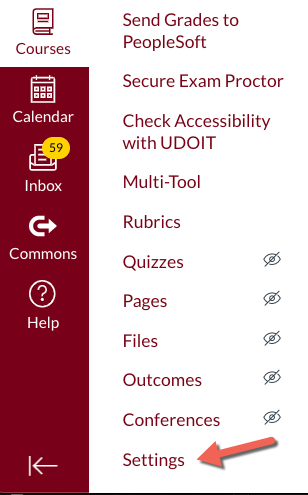
In Settings, click on the Navigation tab.

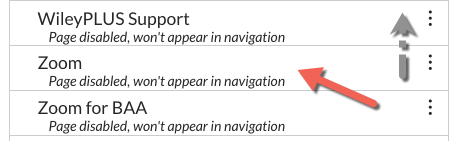
Scroll through the bottom column and select, Zoom. Drag the Zoom box up to the top column.
(Please note - the Zoom for BAA option is for those courses associated with the Health Care Component. Most CCAPS courses are NOT part of the HCC, so please don't choose this option.)
Drop the Zoom box where you want it to appear in your course navigation.
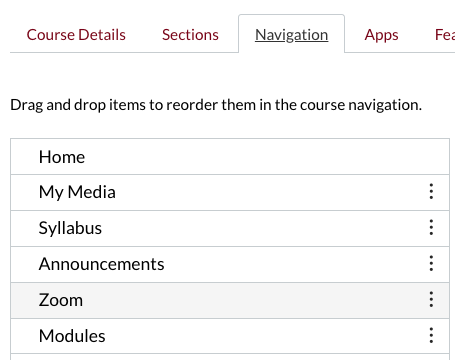
Make sure to click on the Save button.
Step 2: Schedule your Zoom Class Sessions
You should see that Zoom is available in your course left navigation menu. Click on Zoom.
Select the Schedule a New Meeting option.

Change the title of your Zoom Topic to something like this - [Course CRN + Zoom Class Session}. When students view their Canvas calendar, they can quickly identify that they have a Zoom session for the course with this title.

Next, select the date and time of the first class. Select Recurring meeting if you are meeting with your class over Zoom every week.

- For the Security options, select the Waiting Room option. The Waiting Room provides you with, what is essentially, a secure door to your Zoom meeting. People will not be able to enter your Zoom meeting until you start the meeting and admit students from the waiting room one at a time or all at once. You can manage the waiting room using the Participants button/panel.
- Require authentication to join - With this option selected, students have to sign into Zoom in order to access the Zoom meeting.
- If you choose not to select this option, make sure you enable the Waiting Room so that your meeting has the most basic level of security applied to it.

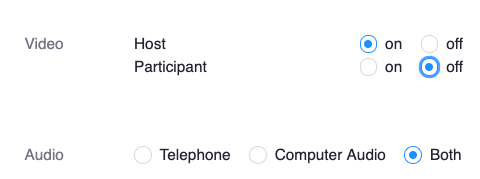
- For the Video settings, choose the defaults that you want, either webcams turned On at the start of the meeting or off. Students can always choose to turn on their webcams.
- For the Audio settings, choose Both. With the Both setting enabled, students will be able to use the phone to dial into the meeting if they can't get their computer audio to work.
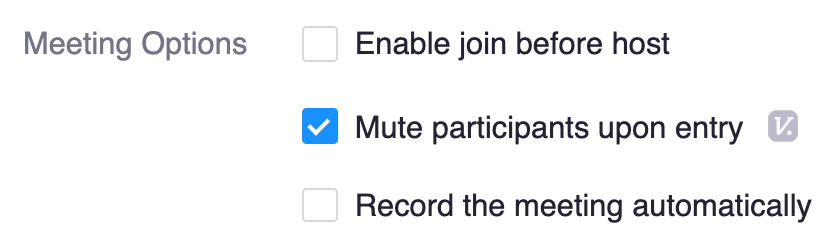
Meeting Options
- Enable join before host - With this option selected, students will be able to join the meeting before the host. Please note that if you have the Waiting Room enabled, the Enable join before host will not work.
- Select Mute participants upon entry. You want to limit any embarrassing starts to the Zoom meeting for students, so make sure to have mics muted when students first enter the Zoom meeting. Students can always unmute themselves during the meeting.
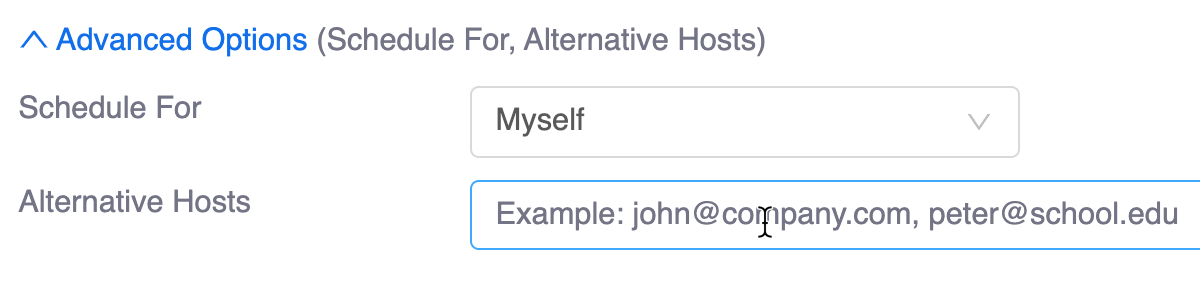
Advanced Options
If you are co-teaching the course or you have a TA, add your co-instructor or TA as an Alternative Host . They will then be able to start the Zoom meeting without you.
Make sure to hit the Save button to save your settings.
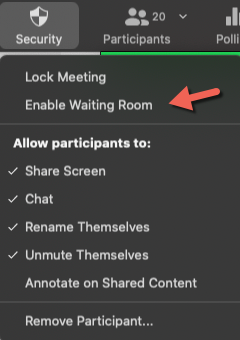
The Zoom Security button
Use the Zoom Security button to enable or disable Zoom features while you are in a Zoom meeting.
Zoom Security button
- Lock Meeting - With this option selected, no one will be able to enter your meeting. Be careful with this setting. If a student gets kicked out of the meeting due to Zoom crashing on them, they will not be able to rejoin the meeting.
- Enable Waiting Room - As mentioned above, when you join your Zoom meeting session, you can choose to uncheck the Enable Waiting Room selection and your guests will start entering your room without having to wait to be admitted.
Allow Participants to:
- Share Screen - If this option is selected, your students/participants will be able to share their screen during the Zoom meeting.
- Chat - Enables the Zoom chat feature.
- Rename Themselves - Allows students/participants to rename themselves.
- Unmute Themselves - Allows students/participants to Unmute themselves (if you chose to Mute all)
- Annotate on Shared Content - Allows students/participants to use the annotation tool. Consider deselecting this option as students/participants might use this feature to disrupt the class.
- Remove Participant... - Remove someone from your Zoom meeting.